Sunday, January 18, 2009

Test Track II (N scale)

Before starting a project as big like the coffee table model railroad, I want to make sure certain things will work. Therefore I am now making a little test lay-out that allows me to test all the things that could potentially block creating the coffee table track.

It's also my introduction to digital railroading so it is also good to try it out like this first in that respect.

Before anything can be tested, three phases have to be completed:
  1. Construction of the lay-out
  2. Wiring the lay-out
  3. Writing software to operate the lay-out

This blog post describes phase one: Constructing the lay-out.

First the plans. It will be a two level lay-out. This is the bottom part:

A simple reverse loop which is entered after driving down the spiral through the inside track.

This is the top part:

When arriving at the top level the train can run through the loop and go down again or it can enter the station where the loco can be driven to the front of the train again if necessary.

I used the spiral parts that I created before. For tips on how to create one, look at this blog post.

NOTE: The reverse loops must be isolated from the rest of the track otherwise you will get an electric short cut!

I got a 100 x 54 cm piece of wood. Well, MDF. Mark the holes for the threaded rods for the spiral.

After the holes are drilled we can start.

Laying out track is not very hard. Here I'm up to the first level in the spiral. I put a little piece of double sided tape underneath the track in some places so the track lies nice and sturdy.

Here the spiral is finished.

I cut another piece of MDF. This one had a size of 54 x 50 cm. I attached it with threaded rods as well.

Then bridge the gap between the spiral and the top level and lay out the rest of the track.

Spiral view.

Top view. Ready for wiring.

Wednesday, December 24, 2008

Installing Windows from USB on the Asus Eee pc 1000H

As a new owner of an Asus Eee pc 1000H one of the first things I wanted was to install Windows XP my self. I didn't like how it had loads of stuff pre-installed. But because the device does not have an optical drive the only external device I could boot it from was a USB stick. I never created a bootable USB stick and getting the Eee pc to boot from it was not easy either. Then there is the issue of Asus only providing an image of the factory installed system so that you can really only get it back to the factory 'cluttered' default state. You can not do a clean install from that dvd.

But there are tricks. Tricks that allow you to start a proper Windows XP installation from a USB stick. A Windows XP installation that was created from the factory installed Windows XP on your Eee pc. I'll outline everything in this blog post.

Disclaimer
Everything described in this post worked for an "out of the box" Eee pc 1000H (with finished setup) using a 4GB Kingston DataTraveler USB stick (slider version).

Performing the above actions CAN result in failure with your computer's harddrive being wiped withough having a working installation of Windows on it.

Entering the BIOS.
First things first. It's hard to enter the BIOS of the Eee pc. To make it easier, once you manage to get in by keeping the F2 key pressed whilst booting, find the "Boot Booster" setting and disable it. This will make the booting a bit slower but it will allow you to enter the BIOS or the boot menu a lot easier. Which brings me to the next issue.

The Boot menu.
The Eee pc can boot from USB devices such as USB sticks or optical USB connected devices. Even though you can set the boot order in the BIOS to look for a USB device first, it never worked for me. But then I found out that pressing ESC while booting takes you to the boot menu where you can select any connected USB device.

Creating a bootable USB stick that starts the Windows XP setup.
First off you need to download some Windows 98 DOS files here and unzip them in a directory anywhere. Also, just incase, download the USB Disk Storage Format Tool here.

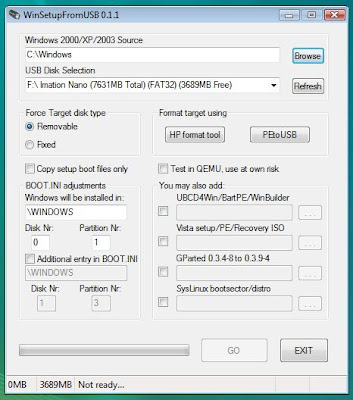
Now you need to install a little tool called WinSetupFromUSB on your Eee pc. This tool will use your existing Windows installation to create setup files with. You can download it from here and you find more info on it here. After installing you can run it from the Windows Start menu and this is what it looks like:

With the top-most Browse button, locate the folder that has the I386 folder in it and select that folder. With the second Browse button, select your USB stick.

If you haven't prepared your USB stick yet, click the HP Format Tool button. This will start the USB Disk Storage Format Tool from Hewlett-Packard. You may need to install this previously.

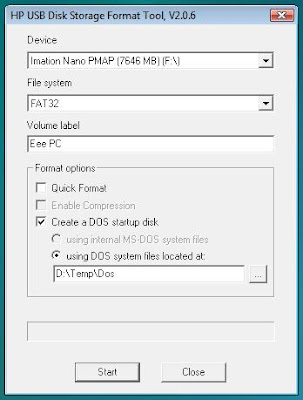
The USB Disk Storage Format Tool has the following interface:

After setting the interface's properties like above, hit the Start button. It will create a Windows 98, DOS-mode bootable USB stick.

When this is finished, you return to the WinSetupFromUSB screen. When you hit the Go button it will start creating a Windows XP setup on the USB stick for you. This may take a while. Maybe go watch some Family guy episodes or something.

Installing Windows XP
When the setup is created and you reboot your machine, keep the ESC key pressed to select your USB stick to boot from.
Select the first part of the setup. This will start the text based part of the Windows XP setup. After a reboot (leave the USB stick) press ESC again to boot from the USB stick and this time select the second setup-stage which is the GUI part.
If you forget to press ESC the Eee-pc will boot from the hard disk and complain it can't find the file HAL.DLL.

From here onwards you just follow the Windows XP setup.

When Windows is installed you will need to install all the drivers manually. You can find those in the Drivers directory on the Asus provided dvd. Copy them on a USB stick and install them one by one.

Saturday, September 20, 2008

Finishing the drawers

OK, it's taken a while but you know, I'm a busy guy...

To finally finish the drawers, all that needed to be done was putting on a nice front and knob. The fronts I made from plywood panels, 4 mm thick. The knobs I bought at the hardware store.

I measured the size quite precise. Then the panels were cut and glued on to the drawers. Use a glue that dries fast so that you don't have to keep it pressed for hours. You wouldn't enjoy that, trust me.

In the picture you can see that I stuck a little piece of paper in between two panels. Like wise I also had one stuck under the bottom drawers at some point. This is to make sure the panel doesn't move down. You know, gravity and such.

After they dried I drilled a hole in the front where the knob would come. Screw the knob on and it's done.

Finally this project gets the status "closed".

A simple monitor stand

When you are looking at a computer screen eight hours a day, it is important to have them at a correct height otherwise you will screw up a few muscles here and there. Mine seem to get a bit unhappy at the moment so I made this monitor stand to elevate my screens. Another benefit is that you will be able to put the keyboard underneath it, creating room for papers and books etc.

Introduction: Meet Ms. table leg and Mr. shelf.

The table leg can (in my case) be screwed apart. That way we have the leg and the leg-plate. "Leg-plate" is probably not the correct name but I don't know what is. If you do, please let me know.

Use the leg-plate to draw circles where it will be screwed on the wood.

After drilling the holes (make sure NOT to drill all the way through!), mount the leg-plates on the wood.

When all leg-plates have been screwed on the wood, screw on the table legs.

And there she is, a beautiful, simple but elegant, monitor stand.