But there are tricks. Tricks that allow you to start a proper Windows XP installation from a USB stick. A Windows XP installation that was created from the factory installed Windows XP on your Eee pc. I'll outline everything in this blog post.
Disclaimer
Everything described in this post worked for an "out of the box" Eee pc 1000H (with finished setup) using a 4GB Kingston DataTraveler USB stick (slider version).
Performing the above actions CAN result in failure with your computer's harddrive being wiped withough having a working installation of Windows on it.
Entering the BIOS.
First things first. It's hard to enter the BIOS of the Eee pc. To make it easier, once you manage to get in by keeping the F2 key pressed whilst booting, find the "Boot Booster" setting and disable it. This will make the booting a bit slower but it will allow you to enter the BIOS or the boot menu a lot easier. Which brings me to the next issue.
The Boot menu.
The Eee pc can boot from USB devices such as USB sticks or optical USB connected devices. Even though you can set the boot order in the BIOS to look for a USB device first, it never worked for me. But then I found out that pressing ESC while booting takes you to the boot menu where you can select any connected USB device.
Creating a bootable USB stick that starts the Windows XP setup.
First off you need to download some Windows 98 DOS files here and unzip them in a directory anywhere. Also, just incase, download the USB Disk Storage Format Tool here.
Now you need to install a little tool called WinSetupFromUSB on your Eee pc. This tool will use your existing Windows installation to create setup files with. You can download it from here and you find more info on it here. After installing you can run it from the Windows Start menu and this is what it looks like:
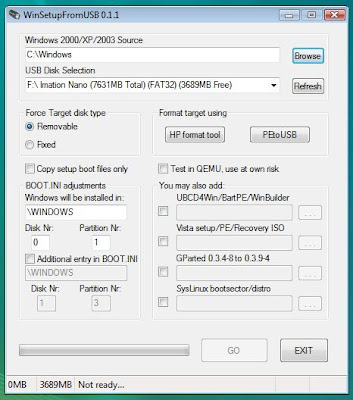 With the top-most Browse button, locate the folder that has the I386 folder in it and select that folder. With the second Browse button, select your USB stick.
 With the top-most Browse button, locate the folder that has the I386 folder in it and select that folder. With the second Browse button, select your USB stick.
If you haven't prepared your USB stick yet, click the HP Format Tool button. This will start the USB Disk Storage Format Tool from Hewlett-Packard. You may need to install this previously.
The USB Disk Storage Format Tool has the following interface:
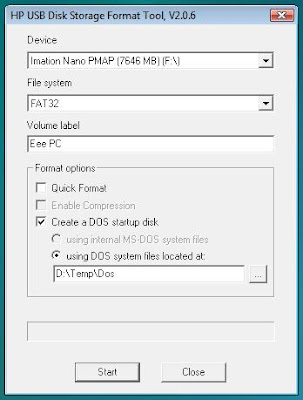 After setting the interface's properties like above, hit the Start button. It will create a Windows 98, DOS-mode bootable USB stick.
 After setting the interface's properties like above, hit the Start button. It will create a Windows 98, DOS-mode bootable USB stick.
When this is finished, you return to the WinSetupFromUSB screen. When you hit the Go button it will start creating a Windows XP setup on the USB stick for you. This may take a while. Maybe go watch some Family guy episodes or something.
From here onwards you just follow the Windows XP setup.
Installing Windows XP
When the setup is created and you reboot your machine, keep the ESC key pressed to select your USB stick to boot from.
Select the first part of the setup. This will start the text based part of the Windows XP setup. After a reboot (leave the USB stick) press ESC again to boot from the USB stick and this time select the second setup-stage which is the GUI part.
If you forget to press ESC the Eee-pc will boot from the hard disk and complain it can't find the file HAL.DLL.
From here onwards you just follow the Windows XP setup.
When Windows is installed you will need to install all the drivers manually. You can find those in the Drivers directory on the Asus provided dvd. Copy them on a USB stick and install them one by one.
