So... I needed a shoe cupboard. Where do we look for a cheap shoe cupboard? IKEA, right. €19,95. But it fits 8 pair of shoes (well, kids sizes, not mine! but anyway...) and I only need it to store 3-4 pair, that's a waste of storage space!
And hence I turned the the top shoe drawer in to a door with a shelve behind it.
Start by purchasing yourself a BISSA at IKEA.
You'll need a few more things. Handles will make the cupboard look a lot better but it also makes it very clear how to open the door or drawer. Without them you'll get people pulling down your door thinking it's a drawer. I bought TAG handles at IKEA.
You need to be careful with the hinges.
The BISSA cupboard fronts are positioned "inside" the cupboard and not covering it. Most hinges that you buy (including ALL the hinges you can buy separate at IKEA!) are for front panels that are positioned to cover the whole cupboard, like the ones in your kitchen probably.
Oh, and you need wood for a shelve later on...
This is what IKEA thinks the BISSA should look like. Well, I'm going to replace that top drawer with a door and put a shelve behind it. If you're curious to see what that looks like, scroll down to the bottom of this post.
We need to pretend we're IKEA engineers now, doing the work that they usually do for us: thinking of where holes need to be etc.
Opening the box gives us a heap of things. Most of it we need.
Now, clear a work space and get a tape measure ready!
Place the left side of the cupboard on the work space and also the 2 fronts, like in the picture above. Put the plastic parts of the drawers on it too. Position them where they need to be then align the holes in the fronts with the holes in the plastic parts.
Positioning the hinges kinda correctly is crucial. Be as accurate as possible. So while everything is aligned, lay down the top hinge and find a place where there are no holes that can be in the way of the ones that we need. I found 6cm from the top of the front to be a good place.
For the bottom hinge these 2 holes were a little bit in the way. Well, potentially anyway.
So I positioned the bottom hinge on top of these holes. More precisely; I positioned the hole in the side panel in between the 2 holes in the hinge. The big hole that is required in the door panel overlaps with the little hole already there so that will be cut out. Perfect plan! ;-)
I was a bit stupid and forgot to get the bottom of the panel in the picture but the 50cm mark is indicating that the centre of the hinge gets aligned 10cm from the bottom of the panel.
The holes for the hinges in the door panel need to be 35mm in diameter and 4mm away from the edge of the panel. So the holes' centers are 21.5mm away from the edge.
Be accurate!
Now, the panel for the door is 15mm thick. The hole for the hinge needs to be 10mm deep minimum. The centre tip on the drill is 4mm.
Panic! So, you want to make very sure not to drill to deep or you will be looking in to a hole from the front. This is nearly undoable by hand so I advise you use a drill-stand with a depth setting. It's a bit close but it can be done, if only you are patient and accurate enough.
I did a pretty good job drilling those holes I have to say. Exactly 1cm deep, 4mm from the edge. Enough to fit the hinges.
The door with the fitted hinges. Just for show, no need to fix them yet.
Now, position everything on the work space like before, but add the right side of the cupboard as well now.
Align things properly.
The positions for screws need to be marked so there can be little holes pre-drilled for the screws. Position the door against the plastic part and determine how far the holes for the hinge need to be away from the edge. In my case it was 58mm. Keep in mind that we have already measured the center-line of the hinges. Remember? 6cm from the top and 10cm from the bottom.
Measure the distance between the holes in the hinge. In my case 3cm is OK. So 1 hole will be 1.5cm above the center-line and 1 hole will be 1.5cm below the center-line. Mark those holes.
Also mark all the holes in the door.
After marking everything for fixing the door, let's think about the shelve for a bit. First we need a small shelve. I happened to have a few shelved of the IKEA PAX system lying around so I took one of those and cut it to the right size using a jigsaw. You figure out the right size by measuring the inside of the cupboard when it gets put together later. So just put the wood for these shelves aside for later now.
The shelve needs to be somewhere close to the bottom of the top front panel but not too low otherwise big shoes might get stuck behind it. So with the tape measure it seems that 40cm from the top of the side panel seems a good idea.
Pretending to be IKEA engineers for a bit longer we have to mark the places where the shelve-holders will be. Do this in both the left and the right-side panels. I thought 1 at 4cm from the back of the panel and 1 at 21cm from the back of the panel would be fine.
Again: be accurate or the shelve will not position well!
Now get some drill bits and start drilling! Be careful not to drill all the way through though. That would be a real pity for all the effort that gets put in ;-) The size of the drill depends on the size of the screw you're using. These holes only exist to make it easier for the screw to go in but it needs to leave sufficient wood for the screw to hold itself on to.
The holes for the hinges go only in the left panel.
Because I opened a pack of PAX shelves I happened to also have these shelve holders. I didn't want to use the "pluggy" bit so I cut that off.
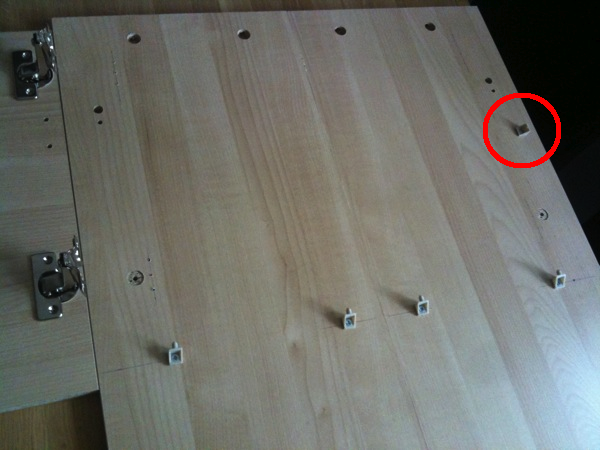
This is what the side panels look like with all the holes drilled and the shelve holders screwed on. Circled is an extra shelve holder that is actually positioned in a way to serve as a door-stop :-)
We are now done with pretending to be IKEA engineers. We can become plain old IKEA customers again and start putting things together now ;-)
First put the cupboard together exactly like the included guide explains but do not put together the top drawer.
Fix the hinges according to the holes we pre-drilled. Then mount the door and also make yourself a shelve to go on the shelve-holders you used.
With the door closed you should not be able to tell the difference between what it's supposed to look like.
But wait! What's that? A shelve?! WOW! ;-)
As a finishing touch, mount the handles. It looks better and everybody will open the door or drawer the right way.
So there's a pimped IKEA BISSA with a shelve instead of a drawer. Good stuff!